The “Text Message” is Dead
Let’s be honest: typing “Happy Birthday! 🎂” into a WhatsApp chat takes three seconds. It also feels like it took three seconds.
In 2026, if you want to make someone feel genuinely special—or if you want to stand out to a client—you send a video. A video captures your voice, your energy, and that specific laugh that an emoji just can’t replicate.
But for most of us, the moment the camera opens, we freeze. The lighting looks weird, we forget what to say, and we end up deleting 15 takes before settling on one that is “just okay.”
It doesn’t have to be that hard.
Whether you are recording a heartfelt wedding tribute, a quick birthday shoutout, or a professional corporate update, the process is exactly the same. This guide will walk you through how to create a video message from scratch—from the script to the final edit—so you look like a pro without needing a film crew.
Phase 1: Pre-Production (Don’t Just Hit Record)
The biggest mistake people make is hitting the red button before they know what they are doing. Take two minutes to prep, and you’ll save twenty minutes of re-recording.
1. Choose Your Format
Before you start, ask: Where is this going?
- Vertical (9:16): Best for Instagram Stories, TikTok, YouTube Shorts, or mobile-first AR greetings. This fills the phone screen and feels intimate.
- Horizontal (16:9): Best for email, desktop viewing, or if your clip is being added to a larger “montage” video (like a wedding guestbook).
- Square (1:1): classic for LinkedIn feeds, though vertical is taking over there too.
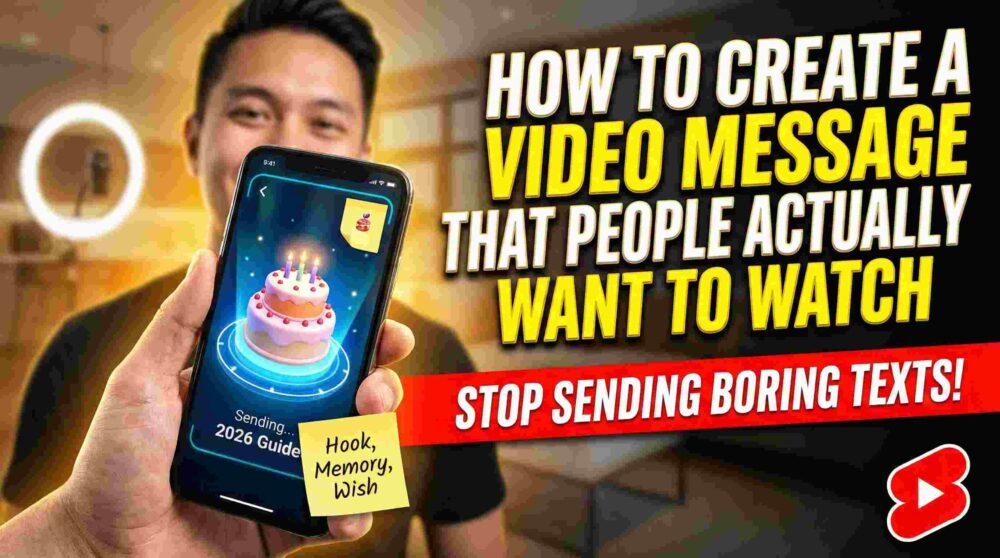
2. The “Post-It Note” Script
You don’t need a teleprompter, but you do need a plan. Stick a post-it note right next to your camera lens with three bullet points:
- The Hook: (e.g., “Happy Birthday, Legend!”)
- The Memory: (e.g., “That Goa trip…”)
- The Wish: (e.g., “Hope you get the promotion.”)
Pro Tip: Never write out your script word-for-word. You will end up reading it with dead eyes. Just use bullet points to keep it natural.
Phase 2: The Setup (Lighting & Audio)
You don’t need an expensive camera. A decent smartphone from the last 3-4 years is more than powerful enough. The difference between a “bad” video and a “pro” video is usually just light and sound.
Lighting: The “Window Rule”
Light is free. You just have to know where to stand.
- The Golden Rule: The light source must be in front of you, not behind you.
- Daytime: Stand facing a window. Put your phone between you and the glass. The soft natural light will smooth out your skin and make your eyes pop.
- Nighttime: Do not rely on the ceiling light (it creates “raccoon eye” shadows). Place a lamp slightly above your eye level, behind your phone.
Audio: The Silent Killer
People will watch a grainy video, but they will scroll past bad audio instantly.
- Kill the background noise: Turn off the AC, the fan, or the TV.
- Distance matters: Hold the phone about arm’s length away. This is the sweet spot—close enough for the mic to catch the bass in your voice, but far enough to not distort.
- Wind check: If you are outside, turn your back to the wind so your body blocks the microphone.
Phase 3: Filming Your Message
Now, the scary part. Actually talking to the lens.
Body Language Hacks
- Eye Contact: Look at the lens, not yourself on the screen. If you look at yourself, it looks like you are avoiding eye contact with the viewer.
- Smile Before You Start: Most people hit record with a frowning “concentration face” and then smile. Reverse it. Smile, wait a beat, then hit record.
- The “Pause” Buffer: Leave 2 seconds of silence at the start and end of your recording. This gives you room to edit later (or gives the editor of the wedding video some breathing room).
What if I mess up?
Don’t stop recording! If you stumble over a word, just pause, take a breath, smile, and say the sentence again. You can trim the bad part out later. It’s much faster than starting a new file every time.
Phase 4: Editing (Adding the Sparkle)
You have the raw file. Now let’s make it shine. You don’t need Adobe Premiere Pro for this (unless you want to).
Best Mobile Apps for Quick Edits (2026)
- CapCut / VN Editor: Great for quick trimming, adding captions, and background music.
- Canva: Excellent if you want to put your video inside a nice “frame” or add a birthday card graphic next to it.
- Native Photos App: Honestly, for a simple trim (cutting the start and end), your phone’s built-in gallery editor is sufficient.
What to Edit:
- Trim the “Dead Air”: Cut the part at the start where you are reaching for the button, and the part at the end where you look awkward.
- Add Captions: 80% of people watch videos on mute first. Auto-captions are a must.
- Music: Add a soft instrumental track at 10% volume. It fills the silence and adds emotion.
Phase 5: Delivery (The “Wow” Factor)
Sending a raw video file via WhatsApp is fine, but it compresses the quality and feels a bit “low effort.” Here is how to level up the delivery.
Level 1: Cloud Sharing
Upload the video to Google Drive or Photos and share the high-quality link. This ensures they see it in full HD, not the pixelated WhatsApp version.
Level 2: The Video Montage
If this is for a group (like a coworker’s farewell), use a tool like Tribute or VidDay to collect videos from everyone and stitch them together automatically.
Level 3: Augmented Reality (The 2026 Standard)
This is the game-changer. Instead of just sending a link, imagine sending a physical birthday card or a photo print. When they scan that photo with their phone, your video message plays on top of the card in the real world.
How to do it:
- Use a platform like MessageAR.
- Upload your video and a “trigger image” (like a photo of you and the birthday person).
- Send them the image (digitally or printed).
- When they scan it, the video comes to life. It’s not just a message; it’s a magic trick.
Common Questions (FAQ)
Q: How long should a video message be?
- Short & Sweet: 30-60 seconds is ideal.
- Deep & Meaningful: Up to 2 minutes. Anything longer, and you better be telling an incredible story.
Q: Can I use a virtual background? Avoid them if possible. Green screen effects on Zoom/Teams often look glitchy and “cheap.” A real, messy bookshelf looks more authentic than a fake beach.
Q: What if I hate the sound of my own voice? Everyone does! It’s called “voice confrontation.” Trust us, you sound normal to everyone else. Don’t let your inner critic stop you from sending a meaningful message.
Conclusion: Just Hit Record
The perfect video message isn’t the one with studio lighting or a Hollywood script. It’s the one that actually gets sent.
Your friends and family don’t want a performance; they want you. They want to see your face and hear your voice. So, find a window, take a deep breath, and hit that red button. You’ve got this.